How to Transfer Videos From Ipad to Windows 10
In this technological era, nothing seems impossible, and this also includes the methods to transfer video from iPad to PC. When it comes to moving (or copying) media clips from your iDevice to a computer, be it Mac or Windows, there are several ways to get the task done. However, there are merely a few methods that are easy and can be completed in a couple of mouse clicks.
The following sections cover 5 best and most straightforward procedures to transfer video from iPad to computer.
- Part 1. Transfer Videos from iPad to A Computer with iTunes
- Part 2. Transfer Videos from iPad to PC with iCloud
- Part 3. Transfer Videos from iPad to Windows 10 with Photos App
- Part 4. Transfer Videos from iPad to Mac with Image Capture
- Part 5. Transfer Videos from iPad to PC with File Explorer
- Part 6. Bonus Tips: How to Transfer Video from PC to iPad
Part 1. Transfer Videos from iPad to A Computer with iTunes
A product from Apple itself, iTunes serves as a control center for all iDevices and Mac computers. Although the program has certain limitations, it is safe, and most importantly, highly promoted by the vendor for all its smartphones, tablets, and PCs.
You can follow the instructions given below to learn how to transfer videos from iPad to PC using iTunes:
Step 1: Get to the iPad window.
Use the original USB cable to connect your iPhone to the computer and wait while iTunes launches automatically (if it doesn't, start manually). Click the Devices icon from the upper-right section of the navigation bar to get to the iPad window.

Step 2: Transfer media files
Click File from the menu bar at the top, go to Devices, and click Transfer Purchases from iPad from the submenu that appears to transfer all your purchased items from your iPad to the computer.
Note: iTunes doesn't let you pick individual files from iPad or iPhone, and only enables you to transfer the purchased items like videos, music, etc. from the iDevices to the PC.

Part 2. Transfer Videos from iPad to PC with iCloud
With the latest iOS installed, you can configure your iDevice to automatically upload all your media files, videos for this example, to your iCloud storage. Although it is likely that your iPad is already all set to do so, it would be wise to recheck if everything is well-configured as expected.
You can follow the instructions given below to check or configure the iPad as needed, and transfer the videos from iCloud on your computer:
Step 1: Check iPad configuration
On your iPad, go to Settings > Photos and check if the iCloud Photos toggle switch under the iCloud section is enabled. If not, turn on the switch. All the media files will be synced appropriately with iCloud before proceeding to the next step.
Step 2: Access videos from iCloud
Launch your favorite Internet browser, go to https://www.icloud.com/, and click Photos, expand Media Types from the Albums category in the left pane. Then, select the Videos container, choose the video you are interested in from the right window, click the Download icon from the top-right corner of the page, and follow the instructions from there to transfer video from iPad to computer.


Part 3. Transfer Videos from iPad to Windows 10 with Photos App
If you are using Windows 10, its built-in Photos app is yet another good program to transfer video from iPad to PC. The application automatically detects the phone as soon as you connect it to the computer via the USB cable, and then lets you import the videos and photos without putting many efforts.
You can learn how to transfer video from iPad to PC on Windows 10 by following the procedure given below:
Step 1: Launch the Photos app.
Search Photos in the Cortana search box at the bottom, or go to Start and click Photos from under the P category in the start menu to launch the Photos app.

Step 2: Import the video
Make sure that your iPad screen is unlocked, and connect the iDevice to the Windows 10 computer with the USB cable. Then, click Import from the top-right corner of the Photos app, click From a USB device on the list that appears, from all the photos and videos, click to select the clip you are interested in, and click Import from the bottom of the window to transfer video from iPad to computer.
Note: The imported video can be found in the Pictures folder of your user account on the computer.


Part 4. Transfer Videos from iPad to Mac with Image Capture
Image Capture is a built-in app in macOS and works more or less the same way the Photos app in Windows 10 does. You can learn how to transfer videos from iPad to computer with Image Capture by using the instructions explained below:
Step 1: Launch image capture.
On your Mac computer, click Launchpad from the Dock, and click Image Capture to launch the app.

Step 2: Select and import the video.
Connect your iPad to the computer via the original USB cable, and Image Capture will detect the connected device and lists all the media files it has. Then, select the video you want to add and click Import from the bottom to transfer the video to your Mac.

Part 5. Transfer Videos from iPad to PC with File Explorer
In addition to the Photos app, Windows 10 also allows you to transfer video from iPad to PC with the File Explorer. You can use it to import the media clips to your computer by using the procedure given below:
Step 1: Launch file explorer.
Connect your iPhone to your Windows 10 computer with the USB cable, and click the File Explorer icon from the taskbar to launch the app. (Close iTunes if it launches automatically)
Step 2: Get to the iPad's internal storage folder.
From the navigation bar in the left pane of the File Explorer window, expand Apple iPad > Internal Storage > DCIM, and select the folder that has the video you want to import.
Step 3: Import the video.
From the right pane, select and right-click the video you are interested in, click Copy, go to the target folder on your local hard drive, right-click anywhere and click Paste to transfer the video using File Explorer.


Part 6. Bonus Tips: How to Transfer Video from PC to iPad
All the programs listed in the above 5 sections allow you to transfer video from iPad to computer in easy steps. However, there is one robust program called Wondershare UniConverter (originally Wondershare Video Converter Ultimate) available for Windows and Mac that can transfer video from computer to iPad with ease. Not only this, but Wondershare UniConverter also has several other tools like screen recorder, video editor, video compressor, GIF maker, DVD burner, etc. All features are integrated into it that make the app a one-stop-shop for almost all your multimedia needs.
 Wondershare UniConverter - Quick to Transfer Videos from PC to iPad

- Convert videos to 1,000+ formats, including AVI, MKV, MOV, MP4, etc.
- It has a 90X faster conversion speed than other common converters.
- Edit videos with trimming, cropping, merging, adding subtitles, and more.
- Burn video to playable DVD with an attractive free DVD template.
- Versatile toolbox includes fixing video metadata, GIF maker, and screen recorder.
- Supported OS: Windows 10/8/7/XP/Vista, macOS 11 Big Sur, 10.15 (Catalina), 10.14, 10.13, 10.12, 10.11, 10.10, 10.9, 10.8, 10.7, 10.6.
![]() Security Verified. 7,851,625 people have downloaded it.
Security Verified. 7,851,625 people have downloaded it.
To learn how to transfer videos from computer to iPad, you can follow the procedure given below:
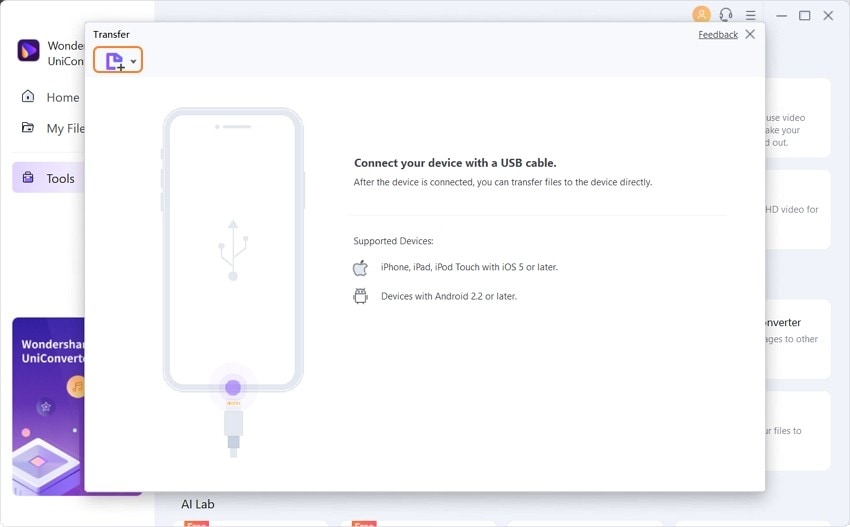
Step 1 Go to the Transfer window.
Launch Wondershare UniConverter on your Mac or Windows computer, and click Toolbox > Transfer from the top.

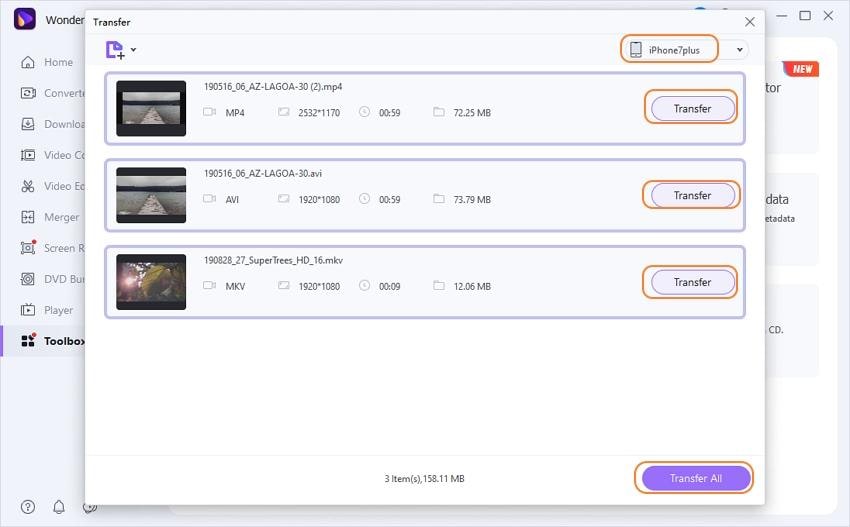
Step 2 Import the video to UniConverter.
Connect your iPad to the computer via the original USB cable, wait while till UniConverter detects the iDevice, click  from the top-left corner, and select and import the video from your PC that you want to transfer to the iPad.
Step 3 Transfer the video to iPad.
Make sure that the name of your iPad is present at the top-right corner of the Transfer window, and click Transfer from the right side of the clip you imported in the previous step to transfer video from computer to iPad.
Conclusion
Although there are several programs and even more methods to transfer video from iPad to PC, merely a few ways can transfer the clips to the iPad from your computer. Thankfully Wondershare UniConverter is not only capable of doing this but can also perform many post-production tasks that many similar tools can't.
How to Transfer Videos From Ipad to Windows 10
Source: https://videoconverter.wondershare.com/transfer/transfer-videos-from-ipad-to-pc.html
0 Response to "How to Transfer Videos From Ipad to Windows 10"
Post a Comment